Master Homemade Sushi: Easy Avocado Rolls & The No-Stick Secret
Imagine preparing homemade sushi: perfectly proportioned, beautiful rolls, fresh ingredients, and the satisfaction of a meal made with your own hands. You've got your crisp nori, vibrant avocado, and trusty bamboo mat ready. Then, the moment of truth arrives – handling the rice. That wonderfully cooked, seasoned sushi rice, meant to bind your roll together, often turns into a frustrating, sticky adversary, clinging stubbornly to your fingers and every surface it touches. If this scenario sounds all too familiar, leaving you wondering how professional sushi chefs manage to make it look so effortless, rest assured, you're not alone. This battle with sticky rice is arguably the biggest hurdle for aspiring home sushi makers.
But what if there was a deceptively simple, almost magical technique to banish the sticky rice struggle for good? Forget the exasperation of uneven rolls and rice-covered hands. We’ve discovered a method that transforms the act of handling that beautifully glutinous rice into an easy and genuinely enjoyable experience. This recipe for
easy avocado sushi rolls not only delivers a delicious, creamy, and deeply satisfying bite but is also specifically designed to make the rolling process smooth, fun, and entirely stress-free. Get ready to embrace homemade sushi without the sticky mess!
The Universal Sticky Rice Struggle & Its Simple Solution
The quest for perfect homemade sushi often begins with excitement and ends with a sticky, rice-covered kitchen. The fundamental challenge lies in the nature of sushi rice itself: its high starch content, essential for holding the roll together, is also what makes it incredibly adhesive. Traditional methods often suggest constantly dipping hands in water, which can dilute the rice seasoning and make it soggy. This leaves many home cooks feeling defeated before they've even truly begun.
However, the "no-stick secret" isn't about fighting the rice's natural stickiness; it's about channeling it effectively and creating barriers. The solution combines two powerful techniques:
1.
The Plastic Wrap Barrier: Instead of placing nori directly on your bamboo rolling mat (makisu), completely cover your mat with a sheet of plastic wrap. This provides a non-stick surface that completely prevents rice from clinging to the bamboo, making cleanup a breeze and allowing for a smoother roll.
2.
The Vinegar Water Hand Dip: Keep a small bowl of water mixed with a splash of rice vinegar (about 1 tablespoon per cup of water) next to your workspace. Periodically moistening your hands with this solution creates a temporary non-stick layer. The vinegar in the water helps prevent the rice from sticking without diluting its flavor, and a little acidity can even make the rice slightly easier to manage. This dynamic duo allows you to spread the rice evenly and confidently without losing your cool or your perfectly seasoned rice.
With these simple adjustments, you'll find yourself gliding through the sushi-making process, transforming a once-dreaded task into a delightful culinary adventure. For more in-depth troubleshooting and advanced tips on mastering this technique, be sure to check out
No-Mess Avocado Sushi Rolls: Your Easy Guide to Sticky Rice Success.
Why Easy Avocado Sushi Rolls Are a Must-Try
Beyond solving the perennial sticky rice dilemma, these avocado rolls shine for a multitude of reasons, making them an ideal choice whether you're a sushi novice or a seasoned home chef looking for a reliable recipe.
*
A Vegetarian Delight: For those seeking plant-based options, these rolls are a dream come true. The creamy, rich avocado offers a satisfying texture and flavor that stands proudly as the star ingredient, proving that vegetarian sushi can be just as exciting and flavorful as its seafood counterparts. They are, in fact, inherently vegan!
*
Unbeatable Creamy Texture: The perfectly ripe avocado, with its velvety smooth consistency, pairs exquisitely with the slightly chewy, seasoned sushi rice and the crisp, savory nori. Each bite is a harmonious blend of textures and subtle flavors that is simply divine.
*
Significantly More Affordable: Enjoying sushi can be an expensive affair, especially if it's a regular craving. Making
easy avocado sushi rolls at home slashes the cost significantly, allowing you to indulge your sushi desires more often without breaking the bank.
*
A Fun & Interactive Culinary Project: Sushi making is inherently hands-on and social. It's a fantastic activity for a date night, a fun way to engage kids in the kitchen, or a unique centerpiece for a family gathering. There's a tangible joy in creating and then sharing these beautiful rolls. I've personally made countless batches of these for family get-togethers, especially when my sister-in-law was pregnant and craving vegan options – they were always a hit! Plus, if you happen to have an avocado tree in your yard, like my dad does, these rolls are an excellent way to use up a bountiful harvest.
*
A Gateway to Experimentation: Once you've mastered the foundational rolling technique, thanks to our anti-stick secret, you'll feel confident to explore a vast world of other fillings. From cucumber and carrot to tofu or even tempura, the possibilities are endless. These
easy avocado sushi rolls serve as the perfect stepping stone to becoming a true sushi artist.
Whether you're new to making homemade sushi or a seasoned pro tired of the mess, this recipe for
easy avocado sushi rolls is poised to become your go-to. If you're eager to learn more about the affordability and fun aspects of homemade vegan sushi, take a look at
Craving Sushi? Easy Avocado Rolls: Vegan, Affordable & Fun to Make.
Essential Ingredients for Your Perfect Avocado Roll
Crafting the perfect vegetarian sushi roll begins with selecting the right foundation – specifically, the seasoned sushi rice – and the freshest ingredients. Here's a closer look at what you'll need and why each component is crucial for achieving optimal flavor and texture.
*
Sushi Rice (2 cups uncooked): This is non-negotiable. You need proper short-grain Japanese sushi rice. Its unique starch profile ensures it becomes sticky enough to hold together when cooked, yet remains pliable enough to work with once seasoned. Avoid long-grain or jasmine rice; they simply won't yield the correct texture or stickiness.
*
Water (2½ cups): The precise ratio of water to rice is vital for achieving that ideal fluffy-yet-sticky consistency. Too much water makes it mushy; too little, and it's dry and crumbly.
*
Sushi Vinegar Seasoning: This simple blend elevates plain cooked rice into the signature sushi flavor.
*
Rice Vinegar (¼ cup): Opt for Japanese rice vinegar (often labeled "seasoned" or "unseasoned" rice vinegar). It's milder and slightly sweeter than other vinegars, with a delicate acidity that perfectly complements sushi.
*
Sugar (2 tablespoons): Balances the acidity of the vinegar and adds a subtle sweetness.
*
Salt (1 teaspoon): Enhances all the other flavors, bringing out the best in the rice.
*
Nori Seaweed Sheets (2 sheets): These dried seaweed sheets form the outer wrapper of your roll. Choose good quality, fresh nori that is dark green, crisp, and has a subtle ocean aroma. Stale nori will be brittle and difficult to roll.
*
Ripe Avocados (1-2, depending on size): The star of the show! Select avocados that yield slightly to gentle pressure, indicating perfect ripeness. Underripe avocados will be hard and flavorless, overripe ones mushy.
*
Optional Enhancements: While not essential, a sprinkle of toasted sesame seeds (white or black) inside or outside the roll adds an extra layer of nutty flavor and visual appeal. Serve with soy sauce, pickled ginger (gari), and a dab of wasabi for the full sushi experience.
Preparing Your Sushi Rice: The Foundation
Mastering the rice is 80% of the sushi battle. Here’s how to prepare it perfectly:
1.
Wash the Rice: Place the sushi rice in a fine-mesh sieve or bowl and rinse under cold running water until the water runs clear. This removes excess starch, preventing the rice from becoming overly gummy.
2.
Cook the Rice: Combine the rinsed rice and 2½ cups water in a heavy-bottomed pot. Bring to a boil, then immediately reduce heat to low, cover tightly, and simmer for 15 minutes. Do not lift the lid.
3.
Steam: Remove from heat and let stand, still covered, for another 10-15 minutes. This allows the rice to steam thoroughly and absorb any remaining moisture.
4.
Season: While the rice steams, gently warm the rice vinegar, sugar, and salt in a small saucepan until the sugar and salt dissolve. Do not boil.
5.
Mix: Transfer the cooked rice to a large, non-metallic bowl. Pour the seasoning mixture evenly over the rice. Using a rice paddle or wooden spoon, gently fold and "cut" the rice with the paddle, incorporating the seasoning without mashing the grains. Continue until the rice is glossy and well-coated.
6.
Cool: Cover the rice with a damp cloth or plastic wrap and allow it to cool to room temperature. Never use warm rice for sushi, as it will wilt the nori and warm your fillings.
The "No-Stick Secret" Unveiled: Rolling Your Easy Avocado Sushi Rolls
With your rice perfectly prepared and cooled, it's time to put our no-stick secret into action and assemble your delicious
easy avocado sushi rolls!
1.
Set Up Your Rolling Station: Lay your bamboo rolling mat (makisu) flat on a clean surface. Critically, cover the entire mat tightly with plastic wrap. This is your primary non-stick barrier. Next, have your bowl of vinegar water ready for moistening your hands. Prepare your avocado by slicing it into thin, even strips.
2.
Prepare the Nori: Place one sheet of nori, shiny side down, on the plastic-wrapped bamboo mat. Align it so the edge closer to you is parallel with the mat's edge.
3.
Apply the Rice (The Hand Technique): Dip your hands lightly into the vinegar water. Take about ½ to ¾ cup of seasoned sushi rice and gently spread it evenly over the nori. Leave a 1-inch border at the top edge of the nori (farthest from you) completely clear – this will be used to seal the roll. The dampness on your hands will prevent the rice from sticking, allowing you to spread it thinly and evenly without frustration.
4.
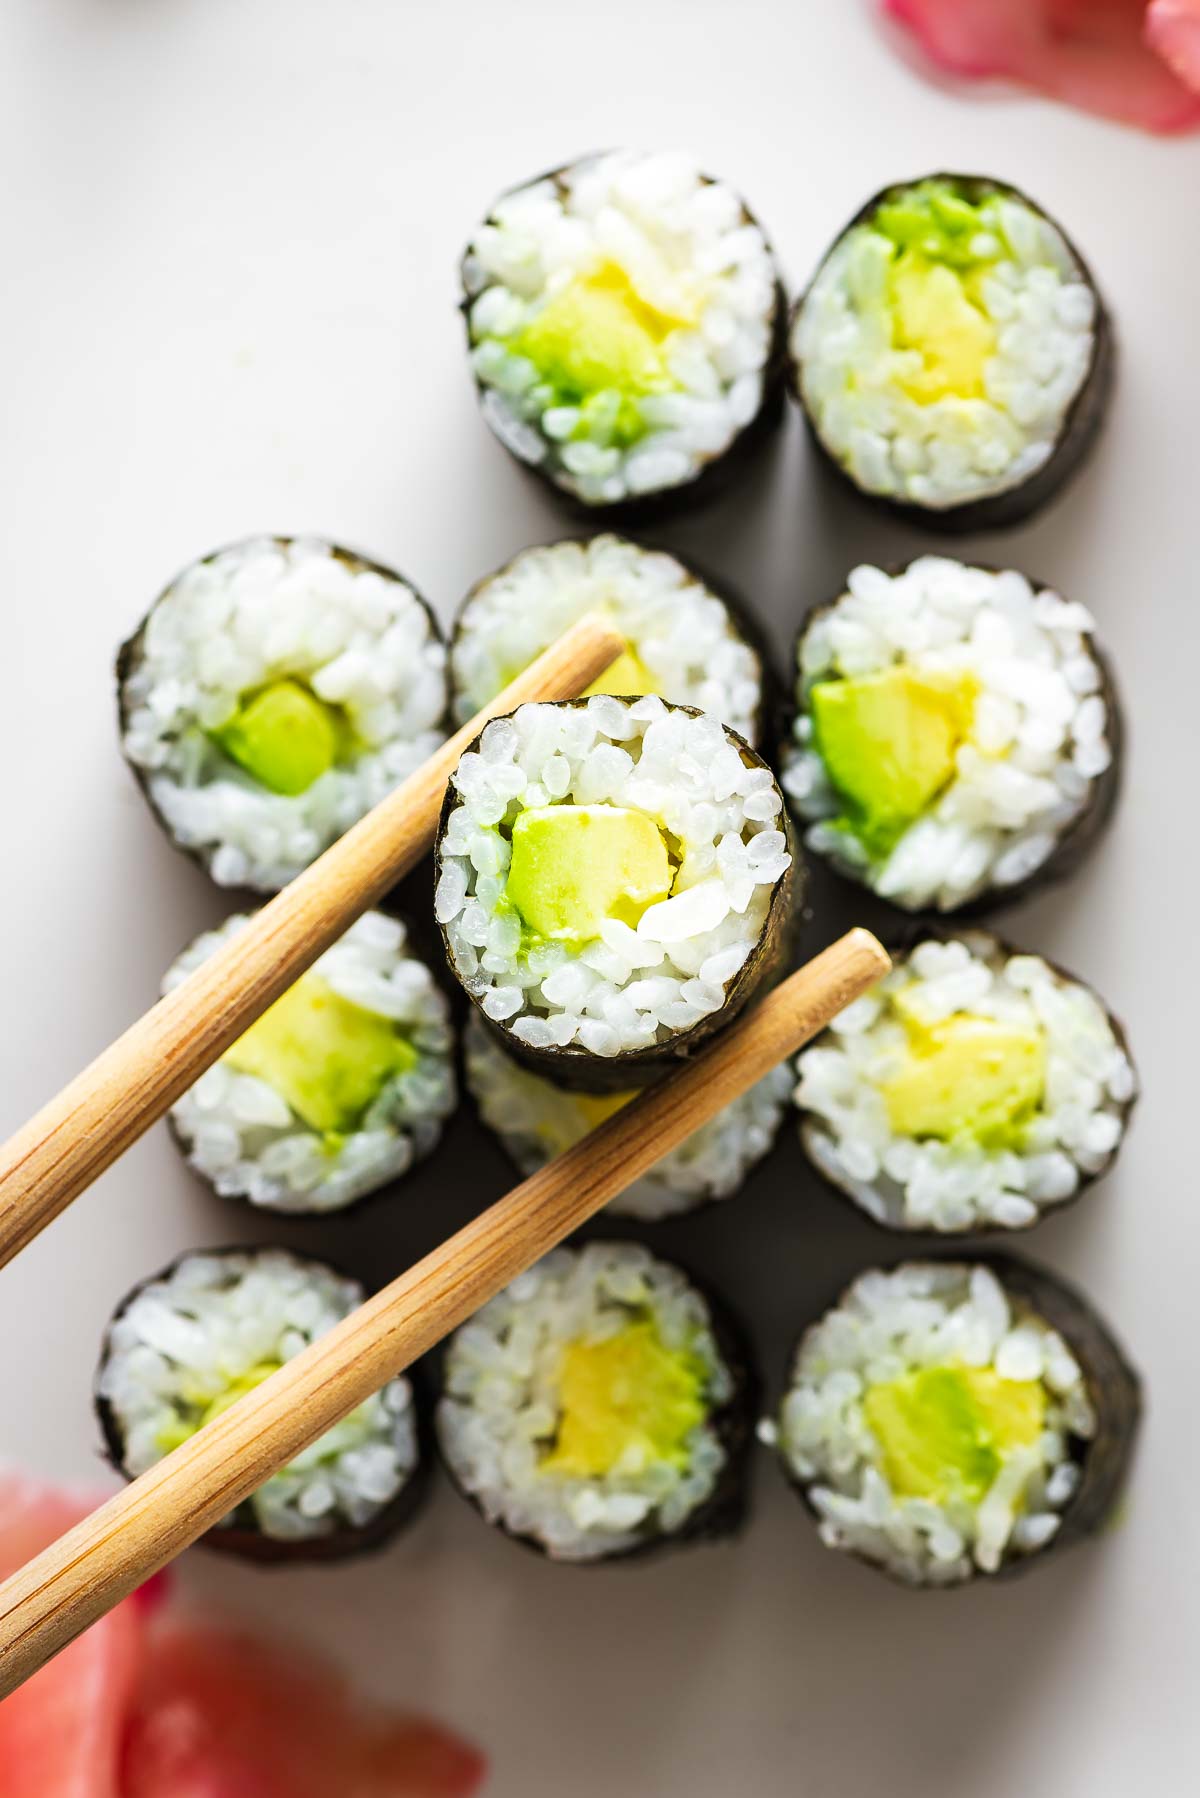
Add the Avocado: Arrange your avocado slices in a horizontal line about 1 inch from the bottom edge of the rice, keeping the filling relatively contained. Avoid overfilling, as this makes rolling much harder.
5.
Begin the Roll: Grasp the edge of the bamboo mat closest to you, along with the edge of the nori. Using your thumbs to lift the mat and your fingers to hold the filling in place, begin to roll the nori upwards, away from you. Aim to bring the bottom edge of the nori just over the avocado filling, tucking it in firmly.
6.
Tighten and Continue: Once the first roll is made, gently press down on the mat to compress the roll and make it firm. Then, lift the mat and continue rolling forward, pulling the mat up and over the roll as you go. Each time you roll, gently squeeze the mat to ensure the roll remains tight and uniform.
7.
Seal the Roll: Once you reach the top edge of the nori (the 1-inch border you left empty), dab a little water on it with your finger. This acts as an adhesive. Finish rolling, pressing firmly to seal.
8.
Slice and Serve: Carefully transfer your completed roll to a cutting board. For clean cuts, use a very sharp knife that has been lightly dampened with water. Slice the roll in half, then cut each half into 3-4 even pieces. Wipe your knife clean and dampen it between cuts for the best results.
Pro Tips for Homemade Sushi Success
*
Sharp Knife is Key: A dull knife will mash your sushi; a sharp one slices cleanly through rice and nori.
*
Don't Overfill: Less is often more with sushi. Too much filling makes rolling difficult and messy.
*
Practice Makes Perfect: Your first roll might not be restaurant-perfect, but each attempt will improve your technique.
*
Experiment: Once you're confident with avocado, try adding other simple fillings like cucumber, bell pepper, or even a sprinkle of toasted sesame seeds within the roll for added texture and flavor.
Enjoy Your Homemade Masterpiece!
You've done it! By embracing the simple "no-stick secret" and following these straightforward steps, you've transformed the often-frustrating experience of making sushi into an enjoyable and rewarding culinary journey. Your
easy avocado sushi rolls are not just a delicious and healthy meal; they represent a triumph over the sticky rice struggle, opening up a world of homemade sushi possibilities. So go ahead, plate your beautiful rolls, pour some soy sauce, and savor the creamy, satisfying taste of your very own creation. Bon appétit!